The Jordan 1 is a classic sneaker that’s not only iconic for its design but also for its story and versatility. That versatility includes the lacing process. Whether you want a sleek and minimalistic look or want to add a unique twist to your style, it’s manageable. So, in this guide, you will learn how to lace Jordan 1s in several ways, and maybe find your style. Remember, lacing your AJ1s or any Jordan sneaker is a creative process! So don’t be afraid to let your personality come out through your kicks. Whether you keep it classic or go crazy, your lacing choices can make your sneakers truly your own. That, and styling your Jordans right!
 But First, the Evolution of Shoe Laces
The Air Jordan 1 has a rich history of its own, but have you ever wondered about the history of shoelaces? So before we dive into how to lace Jordan 1s, let’s go over lace evolution quickly.
3300 BCE (5,200 years ago): Ötzi the Iceman, an ancient mummy, wore the earliest shoelaces known to man. His shoes were stuffed with wild grass and laced with auroch leather, a plant fiber.
12th Century: Medieval knights used “points” – long leather strips – to fasten their shoes.
17th Century: Ribbon laces with ornate designs became a fashion statement in Europe.
1790: Harvey Kennedy patents the first shoelace with an aglet (the plastic or metal tip).
19th Century: Mass production and availability of laces made shoes more affordable for the masses.
1913: Ernest Leeming and J.W. Sheard invented the automatic shoelace-making machine, revolutionizing lace production.
1950s: Canvas sneakers with white laces become a symbol of youthful rebellion- thanks to James Dean!
1980s: The Air Jordan 1 and its unique lacing styles redefine sneaker culture.
2008: No-tie elastic laces, known as hickies, offered convenience and a new perspective to shoe lacing. Totally saved us a whole lot of time!
Present: Shoelaces continue to evolve with self-lacing technology and endless styling possibilities.
How to Lace Jordan 1s in 4 Different Ways!
Let’s set some guidelines first. In case you don’t know, an eyelet is a hole that shoelaces pass through. But you probably already know that if you know your sneaker terms! Usually, AJ1 Highs come with 9 eyelets, the Mids with 8, and the Lows with 7. Generally, Jordans come with flat cotton laces. However, you can experiment with different lace materials like leather, waxed laces, or even custom-designed laces for a fresher look.
And here’s one last tip before we dive in. Make sure you have the right Jordan sneaker size for you before you learn how to lace them. If they’re too big, the toe box will crease. Too small, it will hurt your feet. Now, time to walk you through how to lace Jordan 1s, but here are the end results of the four methods we’ll cover!
 1. The Classic Criss-Cross Lacing
So, the first Jordan 1 Sneaker lacing method is a timeless classic. You can do this two ways, either loosely or tightly, it’s up to your preference. Loose may be more stylish but a tight lacing is better for performance. For example, if you wanna hoop, tight lacing is it!
1. Insert one lace end into the bottom eyelet from the outside, leaving an equal length on both sides inside the shoe.
2. Cross the left lace over to the right side and insert it into the next eyelet from the bottom, going from the inside to the outside.
3. Cross the right lace over to the left side and insert it into the next eyelet from the bottom, going from the inside to the outside.
4. Continue this criss-cross pattern, always crossing the lace from the inside to the outside and alternating sides as you go up.
5. Repeat the pattern until you reach the top eyelet. Once you reach the top, tie a standard knot to secure the laces. And just in case, here’s how to tie the standard knot without the rabbit story.
2. The Straight Bar or Hidden Knot Lacing
This one looks impressive and gives off a futuristic kinda vibe. Actually, it looks like magic, but in fact, it’s a very simple trick.
1. Start by inserting one lace end into the bottom eyelet from the inside, leaving an equal length on both sides inside the shoe.
2. Pull both lace ends up, ensuring they are even in length.
3. Cross the left lace over the right lace, forming a simple knot.
4. Instead of pulling the knot tight, tuck the ends under the opposite sides so they disappear inside the shoe. This creates a hidden knot.
5. Adjust the tightness of the hidden knot to your preference, ensuring comfort.
3. The Diamond Lacing
You see, this may be a little advanced to grasp in writing if you just looked up how to lace Jordan 1s and make them look good. No worries though, because it’s so worth it! This lacing method gives you that extra edge and shows that you’re dedicated to the craft.
1. Insert one lace end into the bottom eyelet from the outside to the inside of the shoe. Leave an equal length of lace on both sides inside the shoe.
2. Take the left lace and insert it into the third eyelet on the right side.
3. Insert that same lace in the eyelet below the third, the one you skipped, in a vertical way, not diagonally.
4. Repeat the same pattern and steps for the right lace.
5. That’s basically it! You will continue doing this pattern. However, after the first time, you don’t need to skip an eyelet. Immediately put the lace in the eyelet across it. This means you will vertically insert the lace in an eyelet that is already occupied.
6. Feel free to alternate how the laces will cross over each other. Once you reach the top eyelet, tie a standard bow knot to secure the laces
4. The Zig-Zag Lacing
Finally, this lacing method is effortless nonchalance! It looks so smooth but needs a bit of focus to follow through.
1. Insert one lace end into the bottom eyelet from the outside to the inside of the shoe. As usual, leave an equal length of lace on both sides inside the shoe.
2. Start with the left-side lace and insert it directly into the eyelet above it in an outward motion, vertically.
3. With the same left-side lace, go diagonally across to the second eyelet on the right side.
4. You will repeat steps 2 and 3 with the same lace until you reach the top. Here you will hide the remaining lace under the tongue.
5. Now you will go back to the right side of the lace, which we left out so far. Insert it in through the hoops you created with the left-side lace.
6. Repeat that motion until you pass through all the hoops. You can hide this part too under the shoe’s tongue at the top. But if you need a more comfortable grip, you can reverse-tie the laces behind the tongue.

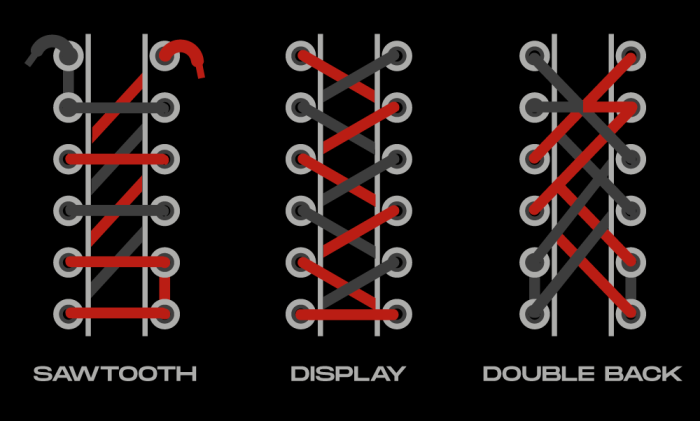
Now that you know how to lace Jordan 1s in four different ways, you gotta keep in mind that there are many more! So in the picture above, you can see more ways to tie your laces. And well, there is no rulebook for lacing your kicks, so might as well wing it and learn. Oh, and if you dig deeper into the spiral web of reels and YouTube videos, you’ll find more crazy cool ways!
Now That You Know How to Lace Jordan 1s
These four styles offer a variety of options to customize your Jordan 1s. But if you wanna learn how to lace Jordan 1s, you need to have a pair on hand to train on. Now, how can you score a pair or buy kicks in bulk? Well, this is exactly where sneaker botting comes in! Investing in a sneaker bot is a great way to score the hottest kicks and maybe make some profit off of them. We’ll keep it short here, but our blog has all you need to know about starting a lucrative side gig. Godspeed!


